You will need:
- Jade colored beads (I used two sizes)
- Red spacer beads (totally optional)
I got two of each size beads, and one of the red spacer beads.
- "Jewelry Findings" all purpose pack (whatever finish you choose)
- mono-filament jewelry stringing wire (looks like fishing wire)
- package of jewelry chain (whatever finish you choose)
- scissors
- needle nose pliers
- wire cutters (I was fine without these, but it will probably make your life easier)
All of these things cost me just under $30, I got everything at Michaels. The mono-filament wire was the most costly thing, but I used a 40% off coupon that I had.
I like to put everything out in front of me, it's just easier for me. I didn't use "scissors" but I used precision cutters, same thing :P And the jump rings, clasp, and crimp beads are all apart of the jewelry findings pack. You can also buy these separately from each other, but it was easier for me just to get them in a combined pack :)
18 inches is just an approximate measurement, it just depends on how long you want your necklace.
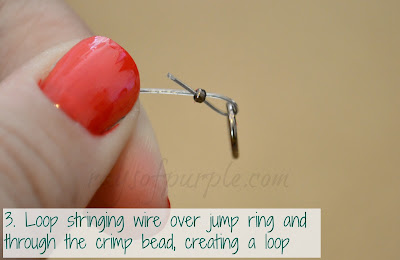
You really don't have to apply a lot of pressure to push the crimp bead.
My first finished strand was about 14 inches.
Repeat step 2 & 3 to close the strand.
Note: you don't have to be exact with the measurement of the strands, being slightly different in length will help the necklace lay better :)
After two strands.
After three strands. This part is now complete :)
Okay, now if you have wire cutters, use them. I didn't, so I just used my pliers to take out a link in the chain to separate the piece from the rest of the chain.
You'll be left with three inches, one for each side of the necklace.
I know it's kind of confusing, but I promise, just take a deep breath, and you'll be okay.
I tried to help with this picture as much as I could, I hope it helps!
Your necklace is finished now! Yay :) It took me around an hour, stringing the beads is what took the longest. The finished necklace ended up being about 22 inches end to end.
Now step back, and admire your work! :)
I used what I had lying around the display my necklaces, a bulletin board and push pins will work for now ;)
Happy Monday everyone :)
Inspiration: makingitlovely.com


So cute! Fabulous job! xo
ReplyDeleteVery pretty!
ReplyDeleteSo I pretty much love all of your tutorials! you make it look so easy! Keep them coming!
ReplyDeleteReally pretty necklace. Great tutorial!
ReplyDeleteThis is a great necklace! I love the beads.
ReplyDeleteThat's a beautiful necklace. Statement necklaces are huge right now!
ReplyDeleteSuper cute, nice choice of beads. I made one in a similar way but I braided the strands.
ReplyDeleteSuper cute DIY necklace. I really want to try this out. Thanks for the tutorial!
ReplyDeletexo - Sheila
sheislovelyblog.com
This is a really great tutorial for someone just starting to make their own jewelry. I love your pictures...they are very clear & super easy to follow. Plus the necklace is cute :)
ReplyDeleteThanks for linking up to The Pinspiration Project!
http://adayinthelifeofamomandawife.blogspot.com/2012/10/the-pinspiration-project-linky-party-9.html
Great tutorial! I have a lot of these tools and have been wanting to put them to use! Thanks for sharing!
ReplyDeleteI used to have a necklace almost identical to this one! Same color, size, and everything! Very cute :) And so many possibilities too.
ReplyDeleteThanks for linking up to The Pinspiration Project - Week #10 just went up today - hope to see you again!